- Photo Safaris
- Alaska Bears & Puffins World's best Alaskan Coastal Brown Bear photo experience. Small group size, idyllic location, deluxe lodging, and Puffins!
- Participant Guestbook & Testimonials Candid Feedback from our participants over the years from our photo safaris, tours and workshops. We don't think there is any better way to evaluate a possible trip or workshop than to find out what others thought.
- Custom Photo Tours, Safaris and Personal Instruction Over the years we've found that many of our clients & friends want to participate in one of our trips but the dates we've scheduled just don't work for them or they'd like a customized trip for their family or friends.
- Myanmar (Burma) Photo Tour Myanmar (Burma) Photo Tour December 2017 -- with Angkor Wat option
- Reviews Go hands-on
- Camera Reviews Hands-on with our favorite cameras
- Lens reviews Lenses tested
- Photo Accessories Reviews Reviews of useful Photo and Camera Accessories of interest to our readers
- Useful Tools & Gadgets Handy tools and gadgets we've found useful or essential in our work and want to share with you.
- What's In My Camera Bag The gear David Cardinal shoots with in the field and recommends, including bags and tools, and why
- Articles About photography
- Getting Started Some photography basics
- Travel photography lesson 1: Learning your camera Top skills you should learn before heading off on a trip
- Choosing a Colorspace Picking the right colorspace is essential for a proper workflow. We walk you through your options.
- Understanding Dynamic Range Understanding Dynamic Range
- Landscape Photography Tips from Yosemite Landscape Photography, It's All About Contrast
- Introduction to Shooting Raw Introduction to Raw Files and Raw Conversion by Dave Ryan
- Using Curves by Mike Russell Using Curves
- Copyright Registration Made Easy Copyright Registration Made Easy
- Guide to Image Resizing A Photographers' Guide to Image Resizing
- CCD Cleaning by Moose Peterson CCD Cleaning by Moose Peterson
- Profiling Your Printer Profiling Your Printer
- White Balance by Moose Peterson White Balance -- Are You RGB Savvy by Moose Peterson
- Photo Tips and Techniques Quick tips and pro tricks and techniques to rapidly improve your photography
- News Photo industry and related news and reviews from around the Internet, including from dpreview and CNET
- Getting Started Some photography basics
- Resources On the web
- My Camera Bag--What I Shoot With and Why The photo gear, travel equipment, clothing, bags and accessories that I shoot with and use and why.
- Datacolor Experts Blog Color gurus, including our own David Cardinal
- Amazon Affiliate Purchases made through this link help support our site and cost you absolutely nothing. Give it a try!
- Forums User to user
- Think Tank Photo Bags Intelligently designed photo bags that I love & rely on!
- Rent Lenses & Cameras Borrowlenses does a great job of providing timely services at a great price.
- Travel Insurance With the high cost of trips and possibility of medical issues abroad trip insurance is a must for peace of mind for overseas trips in particular.
- Moose Peterson's Site There isn't much that Moose doesn't know about nature and wildlife photography. You can't learn from anyone better.
- Journeys Unforgettable Africa Journeys Unforgettable -- Awesome African safari organizers. Let them know we sent you!
- Agoda International discounted hotel booking through Agoda
- Cardinal Photo Products on Zazzle A fun selection of great gift products made from a few of our favorite images.
- David Tobie's Gallery Innovative & creative art from the guy who knows more about color than nearly anyone else
- Galleries Our favorite images
Using Adobe’s Adjustment Brush in Photoshop or Lightroom to rescue awkwardly-lit scenes
Using Adobe’s Adjustment Brush in Photoshop or Lightroom to rescue awkwardly-lit scenes
Submitted by David Cardinal on Thu, 12/26/2013 - 14:19
 Despite the power of post-processing tools, one area that has always been labor intensive and error-prone is correcting images that have multiple light sources with multiple color temperatures. Since white balance is best set on the raw image, correcting for two or more different light sources has required “developing” the image multiple times and then using layers and layer masking to composite a version that shows each area lit correctly. Fortunately Adobe has changed all that…
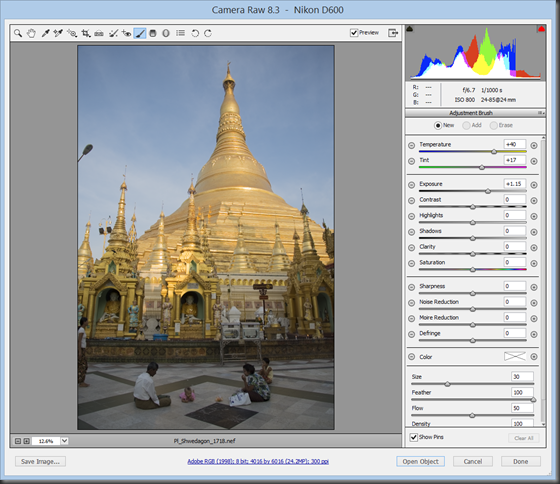
Adobe has added an Adjustment Brush capability to both Photoshop’s Camera Raw and Lightroom’s Develop module. Much of what you can do with the brush mimics actions you could also perform with Adjustment layers – but one capability stands out. You can use one or more Adjustment Brushes to use different white balances for different areas of the image. The first screenshot below shows my original Raw file without any use of an Adjustment Brush. The upper pagoda of the world-famous Shwedagon in Yangon shows off its 100+ tons of gold in the late afternoon. However, the lower portion of the pagoda and the family of worshippers are less attractively lit by the shaded sun. With any single white balance setting you can only make one or the other look good:
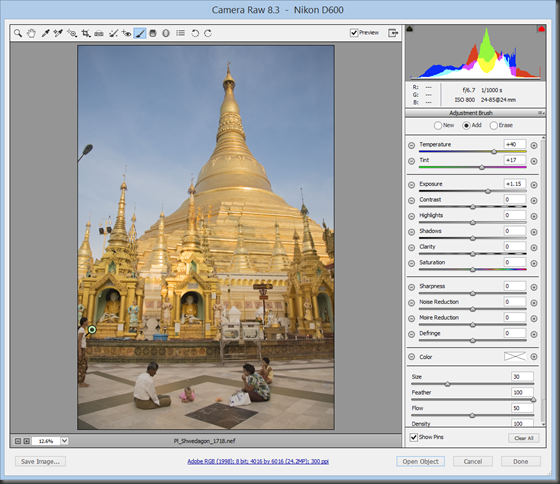
In just a few seconds I can create and apply an Adjustment Brush that adds about 1-stop of exposure to the shaded area, but more importantly significantly warms up the white balance. I can then simply “paint” the adjustment brush onto the image:
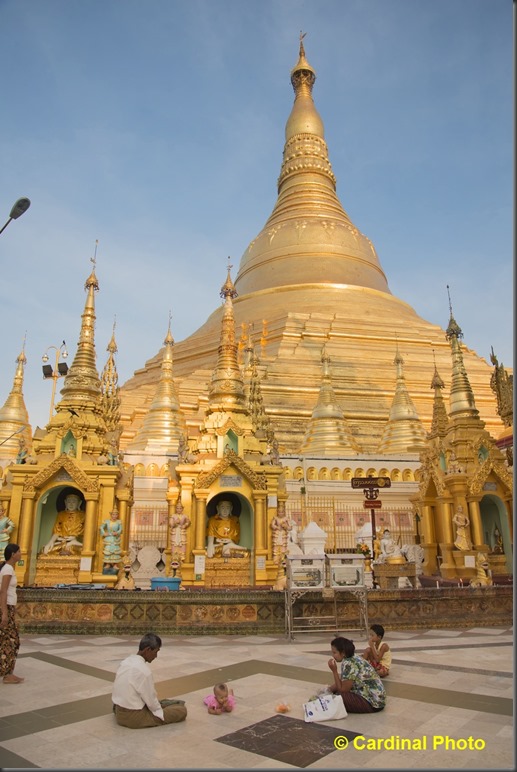
The resulting image does a much better job of representing what our eye and brain do – correct each portion of the scene independently, making everything and everyone in it look natural – but the camera can’t do on its own. The result is a natural looking combination of both white balances:
That image gives us a realistic rendering of the image, although we can tweak it a bit further if we want. Hitting the image above with a bit of added color using Vibrance we can also get a scene that looks much warmer, and might be more enticing for a commercial application like a calendar or travel brochure:
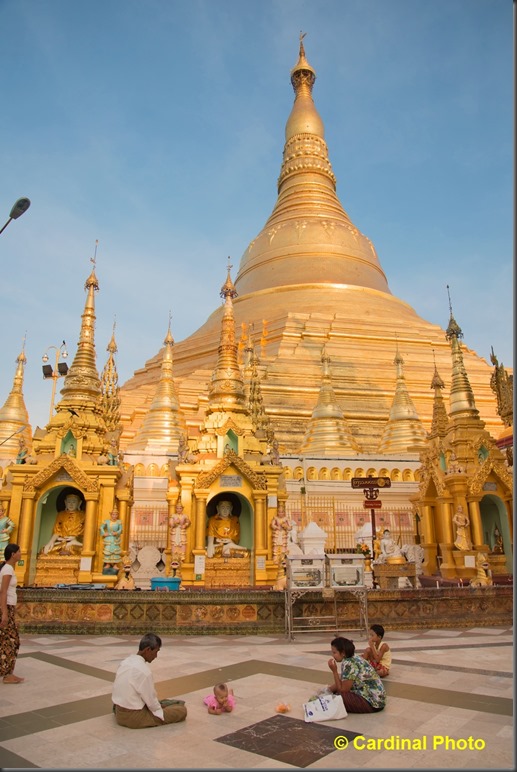
Buddhist Worshippers at Shwedagon Pagoda, Yangon, Myanmar
Nikon D600, Nikon 24-85mm lens @ 24mm, Gitzo tripod with Acratech Head
f/6.7 @ 1/1000s, ISO 800

