- Photo Safaris
- Alaska Bears & Puffins World's best Alaskan Coastal Brown Bear photo experience. Small group size, idyllic location, deluxe lodging, and Puffins!
- Participant Guestbook & Testimonials Candid Feedback from our participants over the years from our photo safaris, tours and workshops. We don't think there is any better way to evaluate a possible trip or workshop than to find out what others thought.
- Custom Photo Tours, Safaris and Personal Instruction Over the years we've found that many of our clients & friends want to participate in one of our trips but the dates we've scheduled just don't work for them or they'd like a customized trip for their family or friends.
- Myanmar (Burma) Photo Tour Myanmar (Burma) Photo Tour December 2017 -- with Angkor Wat option
- Reviews Go hands-on
- Camera Reviews Hands-on with our favorite cameras
- Lens reviews Lenses tested
- Photo Accessories Reviews Reviews of useful Photo and Camera Accessories of interest to our readers
- Useful Tools & Gadgets Handy tools and gadgets we've found useful or essential in our work and want to share with you.
- What's In My Camera Bag The gear David Cardinal shoots with in the field and recommends, including bags and tools, and why
- Articles About photography
- Getting Started Some photography basics
- Travel photography lesson 1: Learning your camera Top skills you should learn before heading off on a trip
- Choosing a Colorspace Picking the right colorspace is essential for a proper workflow. We walk you through your options.
- Understanding Dynamic Range Understanding Dynamic Range
- Landscape Photography Tips from Yosemite Landscape Photography, It's All About Contrast
- Introduction to Shooting Raw Introduction to Raw Files and Raw Conversion by Dave Ryan
- Using Curves by Mike Russell Using Curves
- Copyright Registration Made Easy Copyright Registration Made Easy
- Guide to Image Resizing A Photographers' Guide to Image Resizing
- CCD Cleaning by Moose Peterson CCD Cleaning by Moose Peterson
- Profiling Your Printer Profiling Your Printer
- White Balance by Moose Peterson White Balance -- Are You RGB Savvy by Moose Peterson
- Photo Tips and Techniques Quick tips and pro tricks and techniques to rapidly improve your photography
- News Photo industry and related news and reviews from around the Internet, including from dpreview and CNET
- Getting Started Some photography basics
- Resources On the web
- My Camera Bag--What I Shoot With and Why The photo gear, travel equipment, clothing, bags and accessories that I shoot with and use and why.
- Datacolor Experts Blog Color gurus, including our own David Cardinal
- Amazon Affiliate Purchases made through this link help support our site and cost you absolutely nothing. Give it a try!
- Forums User to user
- Think Tank Photo Bags Intelligently designed photo bags that I love & rely on!
- Rent Lenses & Cameras Borrowlenses does a great job of providing timely services at a great price.
- Travel Insurance With the high cost of trips and possibility of medical issues abroad trip insurance is a must for peace of mind for overseas trips in particular.
- Moose Peterson's Site There isn't much that Moose doesn't know about nature and wildlife photography. You can't learn from anyone better.
- Journeys Unforgettable Africa Journeys Unforgettable -- Awesome African safari organizers. Let them know we sent you!
- Agoda International discounted hotel booking through Agoda
- Cardinal Photo Products on Zazzle A fun selection of great gift products made from a few of our favorite images.
- David Tobie's Gallery Innovative & creative art from the guy who knows more about color than nearly anyone else
- Galleries Our favorite images
For more-effective Action photography, keep these settings at your fingertips
For more-effective Action photography, keep these settings at your fingertips
Submitted by David Cardinal on Tue, 12/19/2017 - 13:36
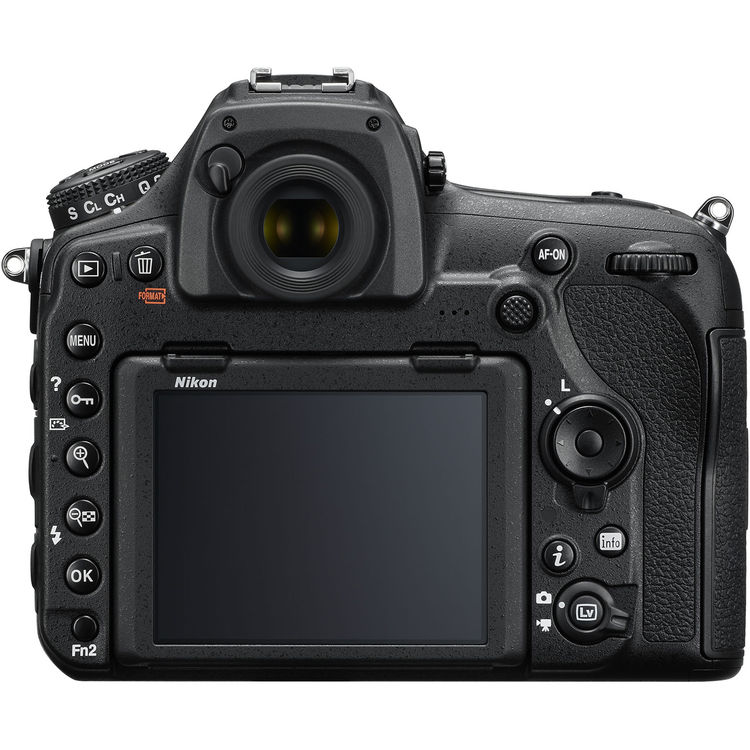 When photographers discuss the pros and cons of various format cameras, the focus is often on image quality and optics. But especially for shooting any type of action – whether it is sports, people, or ceremonial events – ergonomics can be just as important. In particular, by having a properly set up DSLR or mirrorless (I use Nikon models like my Nikon D850 and Nikon D7500, but you can do the same with Canon or Sony) I can keep these key functions literally at my finger tips:
Focus
Whether you rely on moving your choice of AF sensor with the rear joystick (like I do), or use the “Back Focus” method of having a separate focus button and recomposing, you need someway to focus rapidly on a potentially moving subject without taking your eye from the viewfinder. Alternatively, if you are shooting on a tripod, then your left hand may be well positioned to use the focus ring on your long lens.
Aperture or Shutter Speed
Whether you shoot in Aperture Priority or Shutter Speed Priority (Tv on Canon), you’ll want to be able to change your controlling setting quickly. I tend to shoot in Aperture priority and have easy access to changing it using the front command dial on my DSLRs. If you shoot in pseudo-Manual Mode by using Manual + Auto ISO, then you may want quick access to both Shutter Speed and Aperture, although you may start to run short on dials if you also want easy access to Exposure Compensation.
Exposure Compensation
Since I rely on Evaluative (Matrix) metering most of the time, I need to be able to quickly adjust my Exposure Compensation when needed for particular lighting conditions and subjects. To do that, I turn on Easy Exposure Compensation, so moving my rear command dial instantly affects the compensation. The only downside is that if you accidentally nudge the dial you may alter your exposure without meaning to.
ISO
As light levels and the speed of action can change quickly, being able to increase or decrease ISO just as quickly is important. One of the nice improvements in the ergonomics of recent Nikon DSLRs is the move of the ISO button to the upper right near the shutter. That makes it a simple finger move away, instead of its previous location on the top left, which required two hands.
Kill the Flash
Reaching up to turn your flash off and on is both distracting and time consuming, so programming one of your front buttons to temporarily disable your flash makes for a quick solution to capturing fast changing scenes, or experimenting with flash or just ambient light.
Shutter
It probably goes without saying, but you need to have your shutter ready to go. For this reason I use Continuous High as my shooting mode almost all the time. I also work with high speed cards to maximize the number of frames I can capture without my buffer filling up.
What I don’t need at my fingertips
Quality
I almost always shoot in RAW, or sometimes RAW + JPEG, and don’t need quick access to changing the Image Quality.
White Balance
Because I’m capturing and working with RAW images, I typically just leave my White Balance set to Auto and adjust it as needed in post processing. Of course, that doesn’t mean that you shouldn’t try to keep your White Balance setting in line with current lighting – at a minimum it will help your previews more accurate – but in the grand scheme of things, I don’t find it essential to have it at my fingertips while I’ve got my eye to the Viewfinder.
What I wish was a little easier to get at
Since the Nikon D850 doesn’t have a built-in flash, Nikon has removed the Flash button from the front of the camera to the back left vertical row of buttons. They’re pretty easy to reach while you’re shooting, but it can be hard to know which one you have your finger on without looking. So if I need to make a quick Flash adjustment I find myself needing to pull away from the camera and double check that I have the correct button.
All this is especially important if you aren’t young with perfect vision
Depending on your vision, and whether you wear contacts or glasses (or contacts and sometimes reading glasses like I do) it can be very hard to set things up so you can both get an accurate view through your optical viewfinder to help you see whether your subject is in focus and to read the controls on your camera without needing to mess with looking through a certain part of progressive lenses or flip down a pair of reading glasses. So the more controls that have a unique purpose and position that you can reach and adjust without looking, the better. As I’m fond of saying in regards to adjusting settings on your camera while you’re shooting, “If you can’t do it in the dark, you aren’t doing it enough.”
No matter what camera you use, you’ll benefit from thinking through how you set it up so that the functions you rely on in a pinch are as easy and quick as possible for you to get to.
- Log in to post comments

Latest posts
-
Tue, Jun 14 2022
-
Fri, Jul 9 2021
-
Mon, Mar 1 2021
-
Tue, Mar 3 2020
-
Wed, Jan 15 2020
-
Mon, Nov 11 2019