- Photo Safaris
- Alaska Bears & Puffins World's best Alaskan Coastal Brown Bear photo experience. Small group size, idyllic location, deluxe lodging, and Puffins!
- Participant Guestbook & Testimonials Candid Feedback from our participants over the years from our photo safaris, tours and workshops. We don't think there is any better way to evaluate a possible trip or workshop than to find out what others thought.
- Custom Photo Tours, Safaris and Personal Instruction Over the years we've found that many of our clients & friends want to participate in one of our trips but the dates we've scheduled just don't work for them or they'd like a customized trip for their family or friends.
- Myanmar (Burma) Photo Tour Myanmar (Burma) Photo Tour December 2017 -- with Angkor Wat option
- Reviews Go hands-on
- Camera Reviews Hands-on with our favorite cameras
- Lens reviews Lenses tested
- Photo Accessories Reviews Reviews of useful Photo and Camera Accessories of interest to our readers
- Useful Tools & Gadgets Handy tools and gadgets we've found useful or essential in our work and want to share with you.
- What's In My Camera Bag The gear David Cardinal shoots with in the field and recommends, including bags and tools, and why
- Articles About photography
- Getting Started Some photography basics
- Travel photography lesson 1: Learning your camera Top skills you should learn before heading off on a trip
- Choosing a Colorspace Picking the right colorspace is essential for a proper workflow. We walk you through your options.
- Understanding Dynamic Range Understanding Dynamic Range
- Landscape Photography Tips from Yosemite Landscape Photography, It's All About Contrast
- Introduction to Shooting Raw Introduction to Raw Files and Raw Conversion by Dave Ryan
- Using Curves by Mike Russell Using Curves
- Copyright Registration Made Easy Copyright Registration Made Easy
- Guide to Image Resizing A Photographers' Guide to Image Resizing
- CCD Cleaning by Moose Peterson CCD Cleaning by Moose Peterson
- Profiling Your Printer Profiling Your Printer
- White Balance by Moose Peterson White Balance -- Are You RGB Savvy by Moose Peterson
- Photo Tips and Techniques Quick tips and pro tricks and techniques to rapidly improve your photography
- News Photo industry and related news and reviews from around the Internet, including from dpreview and CNET
- Getting Started Some photography basics
- Resources On the web
- My Camera Bag--What I Shoot With and Why The photo gear, travel equipment, clothing, bags and accessories that I shoot with and use and why.
- Datacolor Experts Blog Color gurus, including our own David Cardinal
- Amazon Affiliate Purchases made through this link help support our site and cost you absolutely nothing. Give it a try!
- Forums User to user
- Think Tank Photo Bags Intelligently designed photo bags that I love & rely on!
- Rent Lenses & Cameras Borrowlenses does a great job of providing timely services at a great price.
- Travel Insurance With the high cost of trips and possibility of medical issues abroad trip insurance is a must for peace of mind for overseas trips in particular.
- Moose Peterson's Site There isn't much that Moose doesn't know about nature and wildlife photography. You can't learn from anyone better.
- Journeys Unforgettable Africa Journeys Unforgettable -- Awesome African safari organizers. Let them know we sent you!
- Agoda International discounted hotel booking through Agoda
- Cardinal Photo Products on Zazzle A fun selection of great gift products made from a few of our favorite images.
- David Tobie's Gallery Innovative & creative art from the guy who knows more about color than nearly anyone else
- Galleries Our favorite images
Quick tip: Taming the sun with a Multiply layer in Photoshop
Quick tip: Taming the sun with a Multiply layer in Photoshop
Submitted by David Cardinal on Tue, 12/30/2014 - 09:22
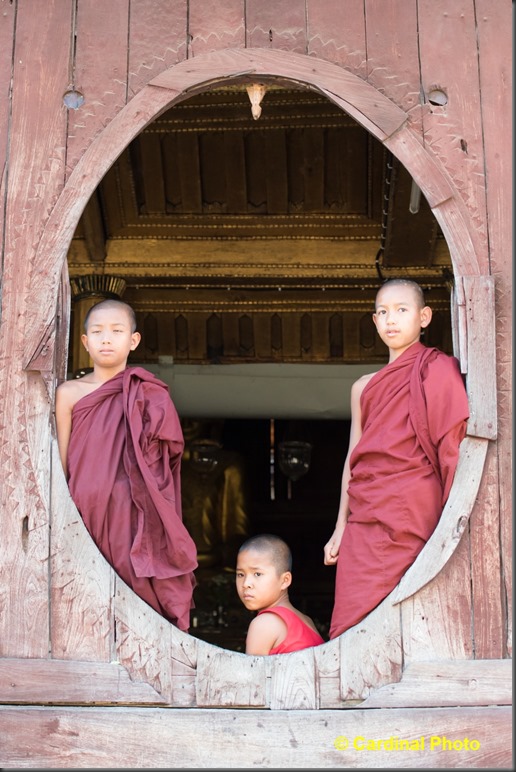
 Sometimes you just can’t control the clock or the sun. The monastery in Nyaung Shwe (in Myanmar’s Shan State) is famous for its historic round wood windows. But finding them with novices peering out from the study hall inside was a special treat. Harsh light or not, it was a great photo opportunity. Having a Nikon D810 certainly helped me capture the full tonal range of the image from light to dark, but another trick was needed to make the image look good…
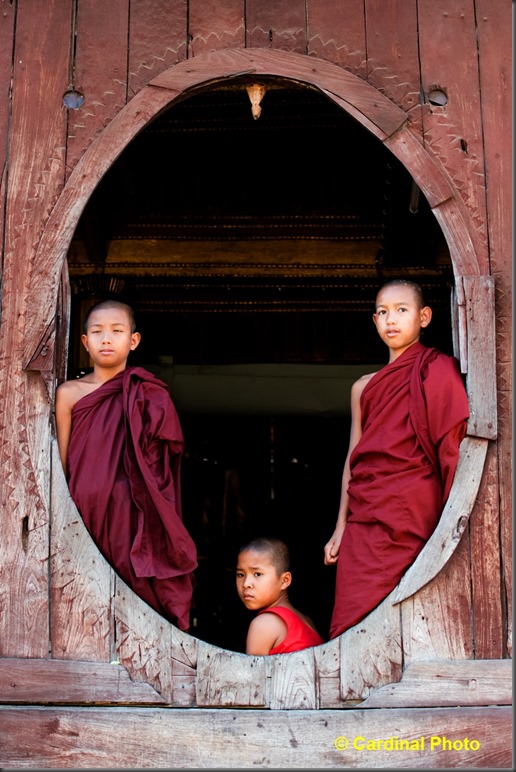
The original capture had almost no detail in the wood, since it was burnt out by the bright sun. The time-consuming way to fix the issue would be to create an adjustment layer with curves or levels, mask it to only affect the wood, and then tweak it until it looked like I wanted. However, a much quicker, and nearly as effective solution also exists – one we walked through back at the hotel with our photo tour participants. Simply Duplicate the original layer, and sent the Blend mode of the new layer to Multiply. The result is a nice boost in contrast that has a particularly strong effect on the high key areas that need help.
Here is the original image:
Here is the version after the 10-second fix of adding a multiply layer:
Note that the multiply layer also brings out the rich reds of the robes, an added bonus. Background detail is lost, but in this case I’m okay with that, as it only detracts from the lines of the window. If we wanted to restore it, we could of course mask off that portion of the Multiply layer.
It doesn’t get any simpler than that! If you’d like to come on an adventure with us to create shots like this of your own, please consider joining us when we return to colorful Myanmar in December, or closer to home for some wildlife & scenic photography on our Alaskan Bear & Puffin safari. Good Shooting – David


