- Photo Safaris
- Alaska Bears & Puffins World's best Alaskan Coastal Brown Bear photo experience. Small group size, idyllic location, deluxe lodging, and Puffins!
- Participant Guestbook & Testimonials Candid Feedback from our participants over the years from our photo safaris, tours and workshops. We don't think there is any better way to evaluate a possible trip or workshop than to find out what others thought.
- Custom Photo Tours, Safaris and Personal Instruction Over the years we've found that many of our clients & friends want to participate in one of our trips but the dates we've scheduled just don't work for them or they'd like a customized trip for their family or friends.
- Myanmar (Burma) Photo Tour Myanmar (Burma) Photo Tour December 2017 -- with Angkor Wat option
- Reviews Go hands-on
- Camera Reviews Hands-on with our favorite cameras
- Lens reviews Lenses tested
- Photo Accessories Reviews Reviews of useful Photo and Camera Accessories of interest to our readers
- Useful Tools & Gadgets Handy tools and gadgets we've found useful or essential in our work and want to share with you.
- What's In My Camera Bag The gear David Cardinal shoots with in the field and recommends, including bags and tools, and why
- Articles About photography
- Getting Started Some photography basics
- Travel photography lesson 1: Learning your camera Top skills you should learn before heading off on a trip
- Choosing a Colorspace Picking the right colorspace is essential for a proper workflow. We walk you through your options.
- Understanding Dynamic Range Understanding Dynamic Range
- Landscape Photography Tips from Yosemite Landscape Photography, It's All About Contrast
- Introduction to Shooting Raw Introduction to Raw Files and Raw Conversion by Dave Ryan
- Using Curves by Mike Russell Using Curves
- Copyright Registration Made Easy Copyright Registration Made Easy
- Guide to Image Resizing A Photographers' Guide to Image Resizing
- CCD Cleaning by Moose Peterson CCD Cleaning by Moose Peterson
- Profiling Your Printer Profiling Your Printer
- White Balance by Moose Peterson White Balance -- Are You RGB Savvy by Moose Peterson
- Photo Tips and Techniques Quick tips and pro tricks and techniques to rapidly improve your photography
- News Photo industry and related news and reviews from around the Internet, including from dpreview and CNET
- Getting Started Some photography basics
- Resources On the web
- My Camera Bag--What I Shoot With and Why The photo gear, travel equipment, clothing, bags and accessories that I shoot with and use and why.
- Datacolor Experts Blog Color gurus, including our own David Cardinal
- Amazon Affiliate Purchases made through this link help support our site and cost you absolutely nothing. Give it a try!
- Forums User to user
- Think Tank Photo Bags Intelligently designed photo bags that I love & rely on!
- Rent Lenses & Cameras Borrowlenses does a great job of providing timely services at a great price.
- Travel Insurance With the high cost of trips and possibility of medical issues abroad trip insurance is a must for peace of mind for overseas trips in particular.
- Moose Peterson's Site There isn't much that Moose doesn't know about nature and wildlife photography. You can't learn from anyone better.
- Journeys Unforgettable Africa Journeys Unforgettable -- Awesome African safari organizers. Let them know we sent you!
- Agoda International discounted hotel booking through Agoda
- Cardinal Photo Products on Zazzle A fun selection of great gift products made from a few of our favorite images.
- David Tobie's Gallery Innovative & creative art from the guy who knows more about color than nearly anyone else
- Galleries Our favorite images
Simple method for photographing Flycatchers in action
Simple method for photographing Flycatchers in action
Submitted by David Cardinal on Thu, 05/05/2016 - 14:44
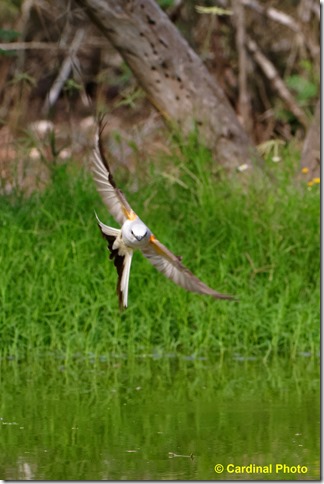
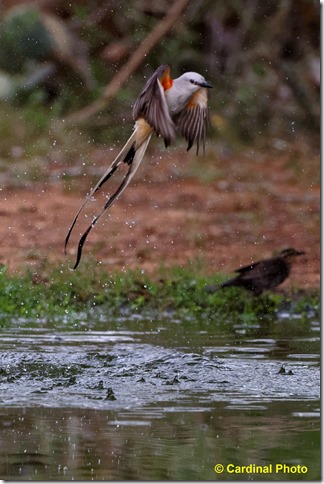
 One of the most fun experiences in birding and bird photography is watching flycatchers hit the water to grab insects. Unfortunately, it is usually only that – an experience. Actually capturing photos of the birds in action is one of the hardest tasks in wildlife photography. It is possible (just barely) to do it by actually tracking the birds, if you have the right gear and just the right setup and background. But most of the time, that simply isn’t an option. However, there is a fairly simple set of steps you can take to give yourself a chance at getting some interesting images, and maybe even some really good ones if you are persistent enough. We experimented with it on our recent Texas bird photo workshop with some good successes. Here is what you need to do:
Pick a spot and pre-focus
For this to work, the birds do need to be somewhat consistent in where they are hitting the water. Watch for a while, and then pick your spot. Focus on it, and then leave your camera on manual focus, so it doesn’t mess up when you try to shoot (if you use back-button AF you don’t need to change to manual).
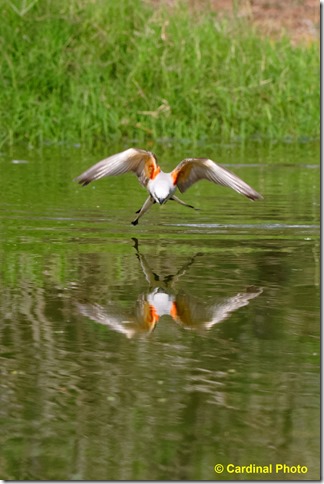
Pro Tip: If the water’s surface is smooth, you will likely be focusing on the reflection. Remember that the reflection actually appears to be at the distance of the background that is being reflected – not the surface of the water. So you’ll need to manually focus on whatever little foam (or bugs) are actually on the surface of the water.

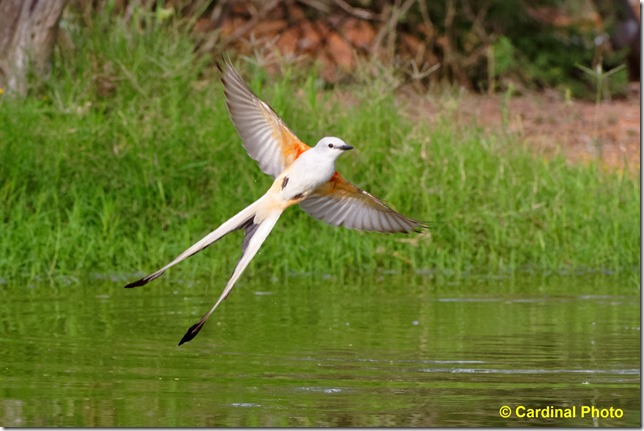
Nikon D810, Nikon 200-400mm f/4 lens (220mm), Manual pre-focus
f/11 @ 1/1000s, –1 e.v. ISO 2200
This image, like all of them in this article, is cropped,
since I’m framing loosely to maximize my chance of getting something.
Lock your tripod down
This is one of the very few cases in wildlife photography where it makes sense to lock your tripod down on a spot. Obviously, that only works if you have a serious enough tripod that you can rely on it to stay aimed where you put it.

Nikon D810, Nikon 200-400mm f/4 lens (340mm), Autofocus (AF-C)
f/8 @ 1/1500s, –1 e.v. ISO 2500
I took this one the “old-fashioned” way, using AF with Dynamic tracking
Frame loosely
Obviously, the birds aren’t likely to hit your exact spot (if you have a way to know that they will, you can skip this step!), so you’ll want to frame loosely by backing out on your zoom, or taking off your Teleconverter, or moving back if you can.
Give yourself some Depth of Field
Similarly, since your timing won’t be exact, nor will the bird’s location, try to give yourself some depth of field (DOF) by using a small aperture. I was using f-stops from f/11 to f/16. Unfortunately, as you increase your DOF, you’re decreasing the amount of light getting to your sensor, and you need a high shutter speed (I used from 1/500s to 1/1500s), so you may need to bump your ISO – perhaps well-above what you normally consider using.

Nikon D810, Nikon 200-400mm f/4 lens (220mm), Manual pre-focus
f/11 @ 1/1000s, –1 e.v. ISO 2200
This image isn’t all that sharp, but I love the reflection so much I had to include it!
Pull away from the viewfinder
This is also one of the only times in wildlife photography where a remote release is truly useful. If you have one, lean back, watch, and get ready. If you don’t, you can still lean back, but need to keep your finger on the shutter button – which can be surprisingly tiring. If you use the finger method (or if your remote doesn’t keep the camera active) you’ll want to half-press the shutter often enough to keep the camera awake.
Shoot early and often
High-frame rate is your friend here! You’ll want to anticipate the dive as much as possible, and start firing before the bird even enters your frame (remember that your finger will press a bit after you tell it to, and the camera will have a small lag after that). Then all you need to do is hold the shutter down until the bird leaves the frame. Yes, you’ll wind up with a lot of empty frames, and a lot of out-of-focus images, or images with only a splash, but deleting is easy with digital!
Don’t give up too soon!
This technique requires some patience and commitment. If there is a lot else going on (which was often the case at the blind where we were using it), it is really tempting to swivel away and work on something else. There’s nothing wrong with that, of course (especially if you remember to put your camera back on Autofocus and change your DOF and maybe your ISO), but you can drive yourself crazy switching around. So this tactic is most useful after you’ve already recorded most of the other species and behaviors at a particular location. In my case, since I’ve been leading workshops in South Texas for nearly a decade, I’m happy to take some time and work on more exotic photos like these. If it’s your first time at a new location, though, there may be plenty else to capture first!
Join us in 2017 if you can
We’ll be returning to South Texas in 2017 with two bird photography workshops. Our Rio Grande Valley Bird Photo Safari (the last week of April) will be in its 10th year! and we’ll be offering our Texas Hill Country Bird Photo Safari (May 3-7) as well. We hope you can join us for one or both of these trips, and work on your own bird photography and image processing – with our help, of course!

Nikon D810, Nikon 200-400mm f/4 lens, Manual pre-focus
f/11 @ 1/1000s, –1 e.v. ISO 2200
- Log in to post comments

