- Photo Safaris
- Alaska Bears & Puffins World's best Alaskan Coastal Brown Bear photo experience. Small group size, idyllic location, deluxe lodging, and Puffins!
- Participant Guestbook & Testimonials Candid Feedback from our participants over the years from our photo safaris, tours and workshops. We don't think there is any better way to evaluate a possible trip or workshop than to find out what others thought.
- Custom Photo Tours, Safaris and Personal Instruction Over the years we've found that many of our clients & friends want to participate in one of our trips but the dates we've scheduled just don't work for them or they'd like a customized trip for their family or friends.
- Myanmar (Burma) Photo Tour Myanmar (Burma) Photo Tour December 2017 -- with Angkor Wat option
- Reviews Go hands-on
- Camera Reviews Hands-on with our favorite cameras
- Lens reviews Lenses tested
- Photo Accessories Reviews Reviews of useful Photo and Camera Accessories of interest to our readers
- Useful Tools & Gadgets Handy tools and gadgets we've found useful or essential in our work and want to share with you.
- What's In My Camera Bag The gear David Cardinal shoots with in the field and recommends, including bags and tools, and why
- Articles About photography
- Getting Started Some photography basics
- Travel photography lesson 1: Learning your camera Top skills you should learn before heading off on a trip
- Choosing a Colorspace Picking the right colorspace is essential for a proper workflow. We walk you through your options.
- Understanding Dynamic Range Understanding Dynamic Range
- Landscape Photography Tips from Yosemite Landscape Photography, It's All About Contrast
- Introduction to Shooting Raw Introduction to Raw Files and Raw Conversion by Dave Ryan
- Using Curves by Mike Russell Using Curves
- Copyright Registration Made Easy Copyright Registration Made Easy
- Guide to Image Resizing A Photographers' Guide to Image Resizing
- CCD Cleaning by Moose Peterson CCD Cleaning by Moose Peterson
- Profiling Your Printer Profiling Your Printer
- White Balance by Moose Peterson White Balance -- Are You RGB Savvy by Moose Peterson
- Photo Tips and Techniques Quick tips and pro tricks and techniques to rapidly improve your photography
- News Photo industry and related news and reviews from around the Internet, including from dpreview and CNET
- Getting Started Some photography basics
- Resources On the web
- My Camera Bag--What I Shoot With and Why The photo gear, travel equipment, clothing, bags and accessories that I shoot with and use and why.
- Datacolor Experts Blog Color gurus, including our own David Cardinal
- Amazon Affiliate Purchases made through this link help support our site and cost you absolutely nothing. Give it a try!
- Forums User to user
- Think Tank Photo Bags Intelligently designed photo bags that I love & rely on!
- Rent Lenses & Cameras Borrowlenses does a great job of providing timely services at a great price.
- Travel Insurance With the high cost of trips and possibility of medical issues abroad trip insurance is a must for peace of mind for overseas trips in particular.
- Moose Peterson's Site There isn't much that Moose doesn't know about nature and wildlife photography. You can't learn from anyone better.
- Journeys Unforgettable Africa Journeys Unforgettable -- Awesome African safari organizers. Let them know we sent you!
- Agoda International discounted hotel booking through Agoda
- Cardinal Photo Products on Zazzle A fun selection of great gift products made from a few of our favorite images.
- David Tobie's Gallery Innovative & creative art from the guy who knows more about color than nearly anyone else
- Galleries Our favorite images
Amazing DxO ONE SuperRAW noise reduction: How it works, and how to roll your own version
Amazing DxO ONE SuperRAW noise reduction: How it works, and how to roll your own version
Submitted by David Cardinal on Wed, 09/30/2015 - 11:18
 One of the most interesting features of DxO’s new DxO ONE camera (#dxoone) is the new SuperRAW image format it supports. SuperRAW is a compound image format, with each image file containing four RAW images taken in quick succession. When the ONE is set to capture images in SuperRAW, the four individual RAW images are shot and stored in a single, proprietary, image file (with a .DXO extension). When processed by DxO’s own OpticsPro or FilmPack software, spatial and temporal noise reduction are applied to the four images, with the resulting output image having lower noise – and better overall image quality -- than any of the four individual captures.
The improvement can be quite dramatic, as shown by the amazing DxOMark rating of 85 for the DxO ONE when shooting SuperRAW (this is as high as many DSLRs). In comparison, when shooting a more traditional single RAW image, the ONE scores a 70 – better than almost any point-and-shoot, and certainly better than a smartphone, but not quite up to DSLR performance. So clearly DxO is onto something here. Let’s look at what makes this approach work so well.
On the face of it, you might think that you could simply take a longer exposure (intuitively, four times as long) and get the same benefit. In reality, you’ll see some benefit from the longer exposure, of course (essentially you can shoot at 1/4 the ISO when you leave the shutter open four times as long, so you’ll clearly have lower noise), but not as much as with SuperRAW. You can see why this is with a simple example. Imagine that a pixel should have a luminance value of 100, but noise adds or subtracts 1 from that value some of the time. So, you’ll get that noise in some of your pixels -- some will be 99, some 100, and some 101, etc. With a longer exposure, you will get less “wrong” values, but the ones you do get will still be averaged into your image, degrading image quality.
![1434733504000_1163039[2] 1434733504000_1163039[2]](http://www.cardinalphoto.com/sites/default/files/1434733504000_1163039%5B2%5D_3.jpg) Instead, if you take several consecutive shots of the same scene – and can perfectly align them – then if only one or two of the frames have incorrect values for a pixel you can ignore them completely, and assume that the correct value is the one found in the majority of images. So, in theory, you can greatly reduce the resulting noise. In practice, there are a lot of technical challenges to implementing a real version of our simple experiment. First, it is very hard to align a scene perfectly across multiple shots, so the image processing software needs to both include powerful auto-alignment functionality, and be able to work with the results. Second, the way noise occurs and is distributed is much more complex than we are making it here, so the process of deciding what is noise is also much more complex. Finally, there is inevitably some subject motion in the scene, which also needs to be accommodated.
Instead, if you take several consecutive shots of the same scene – and can perfectly align them – then if only one or two of the frames have incorrect values for a pixel you can ignore them completely, and assume that the correct value is the one found in the majority of images. So, in theory, you can greatly reduce the resulting noise. In practice, there are a lot of technical challenges to implementing a real version of our simple experiment. First, it is very hard to align a scene perfectly across multiple shots, so the image processing software needs to both include powerful auto-alignment functionality, and be able to work with the results. Second, the way noise occurs and is distributed is much more complex than we are making it here, so the process of deciding what is noise is also much more complex. Finally, there is inevitably some subject motion in the scene, which also needs to be accommodated.
Evaluating SuperRAW using an image comparison tool
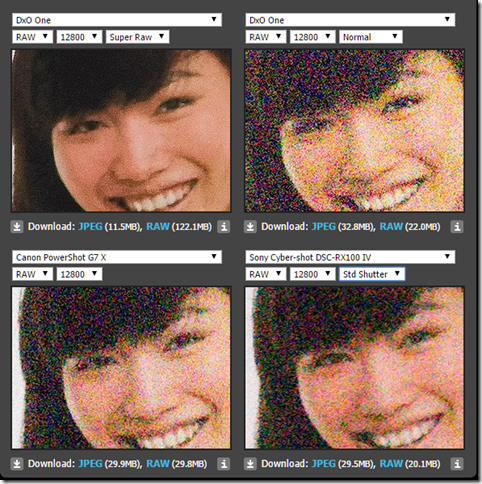
The secret sauce of DxO’s SuperRAW is how well those issues are addressed in its image processing software, to create visibly better images than is possible without it. You can see for yourself exactly how SuperRAW images compare to RAW images of the same scene – and even to other cameras’ images, thanks to the very slick image comparison tool hosted by dpreview. It allows you to look at portions of a studio test scene as shot by a variety of different cameras with different ISO settings. For example, here is a screenshot of a comparison of a SuperRAW image from the DxO ONE with a standard RAW, and with two of the top point-and-shoots on the market. All images are captured at ISO 12,800, to show the cameras when pushed to their limits:
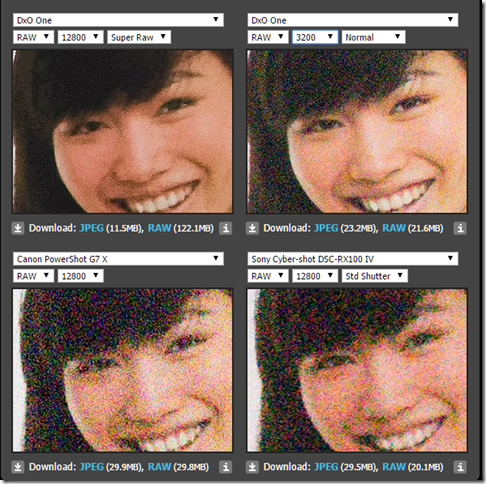
You can view this comparison (or even download the original studio images) on the DPReview website. You can experiment with other combinations of cameras and ISOs to see for yourself the differences. One thing you’ll notice is that SuperRAW, as we expected, does a better job than simply taking a 4x longer exposure. To illustrate that, here is the sample set with the regular RAW replaced with one shot at 3,200 ISO (4x the exposure time):
Making your own Pseudo-SuperRAW images
It isn’t realistic to expect that you can duplicate the advanced technology that goes into creating and processing a DxO ONE SuperRAW image, you can use the same idea to create lower-noise images of your own. The process starts with capturing a series of images of the same scene. How many is up to you. More images means the potential for even-lower noise, but adds to the challenges in aligning them, and to your post-processing time. Best case, you’ll be shooting a static scene on a tripod, but depending on how much work you’re willing to do later, it is possible to do a good job with hand held images, and with some subject motion. Remember that if you’re shooting hand held or dealing with any motion at all, you need to keep your shutter speed high enough that you don’t get motion blur.
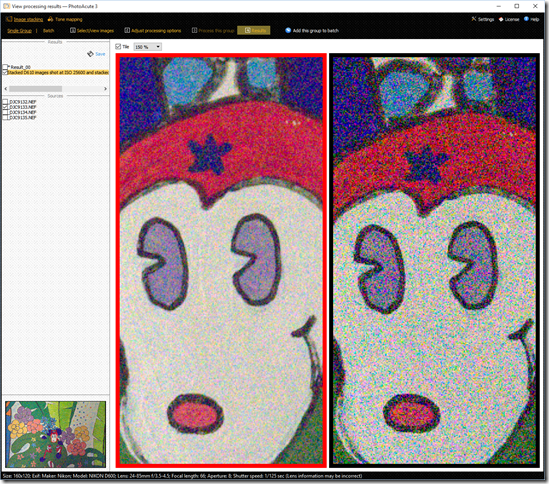
Here are four images I shot of a dimly lit wall mural with my Nikon D610 (technically an updated Nikon D600) at ISO 25,600, to use as a testbed:
There are any number of tools that can aid you with stacking and processing images, but Photoshop is of course the most popular. So the first way I worked on my Pseudo-SuperRAW image was using Photoshop CC.
Using Photoshop to process your Pseudo-SuperRAW image
Photoshop CC has a really nice set of tools to make this process simple. You can do more or less the same thing with earlier versions of Photoshop, but it will require a few more steps. With Photoshop CC, simply:
- First: Open your RAW files into Photoshop (use the same settings for all of them in Camera Raw, to keep things simple)
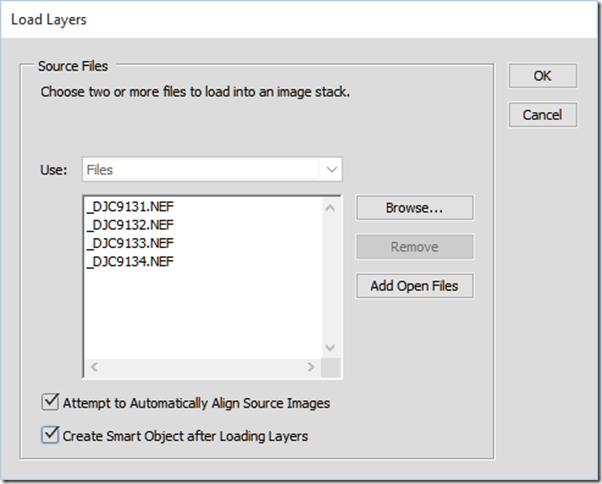
- Second: Use the File->Scripts->Load Files into Stack command, with Add open images. Select the Automatically Align Source Images and Create Smart Object checkboxes. Depending on how powerful your computer is, and how high-resolution your images are, it may take awhile for Photoshop to do the layer alignment.
- Finally: choose Layer->Smart Object->Stack Mode->Median from Photoshop’s menus, to have Photoshop pick the most common value for each pixel. That removes an “outlier” noise pixels.
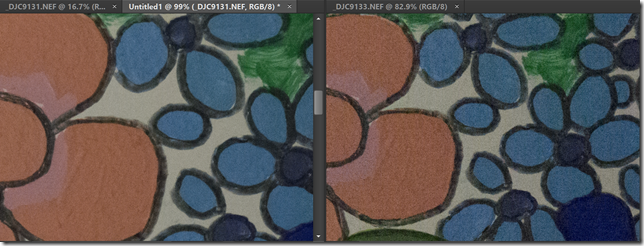
You’ve now got a noise-reduced version of your original scene. You can see the impact of what you’ve done by comparing your resulting image to one of your originals, like in this comparison using the sample images I shot:
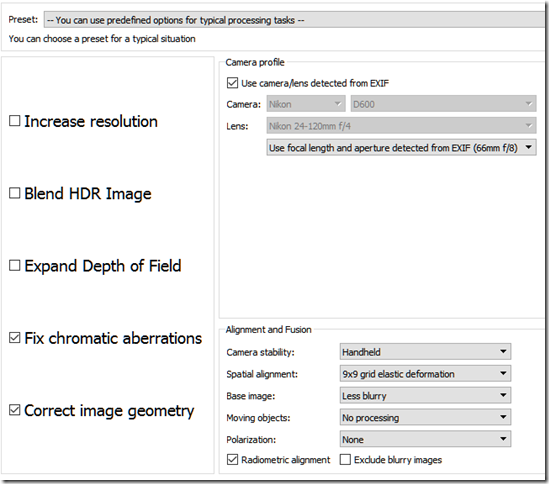
If you’re going to be doing a lot of combining images, you may want to consider investing in a specialized tool, like PhotoAcute.
Using PhotoAcute to automate your Pseudo-SuperRAW processing
PhotoAcute provides a variety of useful functions for combining images, including using several frames of the same scene to increase the apparent resolution. For our purposes though, we can take advantage of the fact that any time PhotoAcute stacks multiple images, it automatically applies noise reduction to them. It also has a very powerful (and user configurable) algorithm for aligning source images.
PhotoAcute will even slightly deform areas of each image to make them line up even if other kinds of distortion are causing problems. In addition, it gives you the ability to work around subject motion in the scene, by providing ghost removal tools.
DxO’s Secret Sauce: Fancier algorithms, dealing with motion, and delivering performance
 Clearly DxO has a lot more up its sleeve than simply applying a Photoshop macro. Indeed, its implementation of SuperRAW has some really unique aspects. First, it is able to deal with a certain amount of camera and even subject motion. Photoshop’s Auto-align and PhotoAcute’s alignment can deal with a certain amount of camera movement and changing distortion, but are not equipped to handle any serious movement in the scene. DxO’s solution isn’t a panacea, so it performs best on stable images, but it can accommodate a variety of changes between the captured images.
DxO has also implemented a high-speed process for capturing all four images quickly. That will minimize the scene and camera motion changes between frames, giving its SuperRAW noise reduction the maximum possible chance to do its work. Finally, the post-processing of SuperRAW images in OpticsPro is much more efficient than the massive number crunching required doing this by brute force in Photoshop or PhotoAcute. So while we can approximate many of the benefits of SuperRAW with some careful camera technique and high-powered post-processing tools, it is still pretty amazing to have all that and more in a two-ounce camera and its software!
- Log in to post comments

